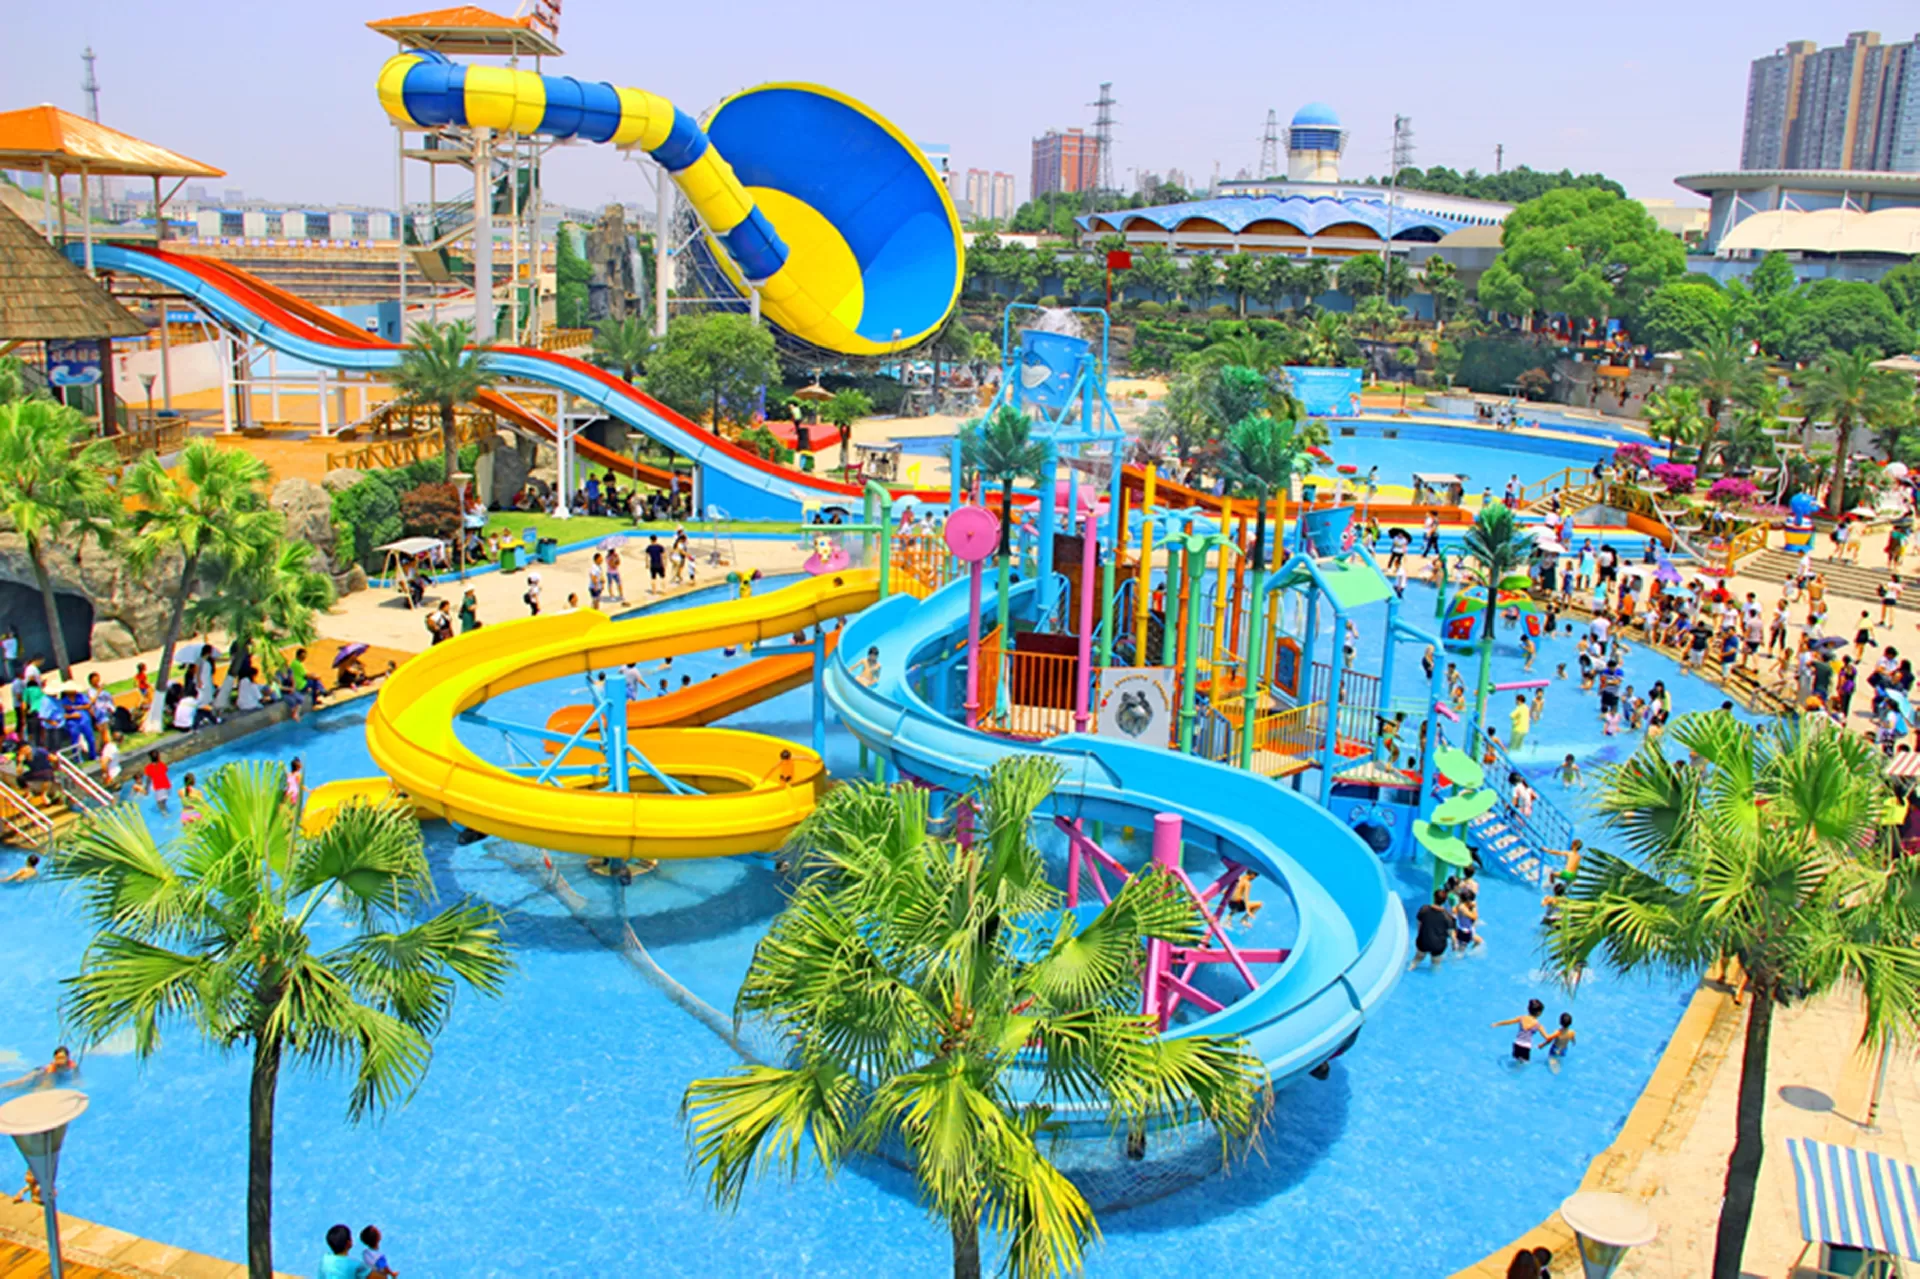
This water park project comprises multiple large-scale pools, including a wave pool, lazy river, children's wading pool, water fort, and standard swimming pool. In addition, auxiliary facilities such as slides and landscape ornaments require coating application. The project aims to create an aesthetically pleasing, durable underwater decorative coating that meets environmental standards. Construction must ensure that the coating maintains long-term stability under prolonged water immersion conditions, with no delamination or fading, excellent chlorine resistance and weather resistance. While enhancing visual appeal, the coating should also guarantee anti-slip safety and an optimal recreational experience for visitors.
Primer: A penetrating primer is selected, featuring excellent permeability to enhance the hardness and strength of the cement surface and improve adhesion to the cement substrate. Each barrel is 20kg, with a theoretical spreading rate of 0.2kg/m².
Middle Coat Leveling Paint: Water-resistant mortar-based paint is adopted, characterized by ease of application, short drying time, and eco-friendliness. It blocks water vapor, enhances adhesion between the base coat and topcoat, serving as a bridging layer in the structure and improving overall surface flatness. Each barrel is 25kg, with a spreading rate of approximately 0.6–1.0 m²/barrel. Note: Material consumption varies depending on the flatness of the substrate.
Topcoat: Long-term weather-resistant aspartic polyurea topcoat, specially developed for prolonged water immersion environments. It boasts strong adhesion, non-fading color retention for extended outdoor use, chlorine resistance, slip resistance, and wear resistance, with rapid curing. Common packaging is 10kg/set, and the applicable area per kilogram ranges from 0.2–0.4 m² depending on the coating thickness.
Auxiliary Materials:
Thinner: Prepared on demand to adjust the construction viscosity of the paint.
Quartz Sand (80–120 mesh): Added to the middle coat to increase surface roughness and optimize leveling effects.
Curing Agent: Mixed with each paint component strictly in proportion to ensure proper chemical curing reaction.
Spraying Equipment: Graco high-pressure airless sprayers (USA) with a pressure range of 1.5–10 MPa. It enables precise flow control, adapts to paints of varying viscosities, delivers uniform atomization, and improves construction efficiency and coating quality. Equipped with multi-specification nozzles for flexible switching according to different construction areas.
Mixing Tools: High-power electric mixers with stainless steel mixing paddles (acid and alkali corrosion-resistant) to ensure uniform dispersion of paint components and prevent sedimentation that may affect performance.
Grinding Tools: Angle grinders with abrasive discs of different grit sizes, used for substrate dust removal, leveling, and cleaning to achieve a smooth and even cement surface.
Testing Instruments: Moisture content testers, distance measuring wheels, adhesion testers, electronic scales, etc., to monitor construction quality throughout the process and ensure coating parameters meet specifications.
Construction Supervisor (1 person): With over 8 years of coating project management experience, responsible for overall scheduling, quality control, safety management, and coordination of all parties involved.
Spray Technicians (3 persons): Proficient in operating spraying equipment, professionally trained and certified, responsible for high-efficiency large-area spraying operations.
Grinding Workers (2 persons): Skilled in precision grinding to ensure the flatness of the substrate and paint surface, laying a solid foundation for subsequent processes.
General Laborers (2 persons): Assist with material handling, on-site cleaning, equipment maintenance, and other miscellaneous tasks to ensure smooth construction progress.
Grind the cement substrate until a textured surface is achieved; the cement surface should not be overly smooth. All surface dust, mortar, peeling, and chalking areas must be thoroughly treated to ensure coating quality.
Concrete Substrate:
New concrete must undergo a curing period of at least 28 days, with a grade of C30 P6 impermeable concrete. The concrete surface should be troweled smooth, free of obvious water leakage or seepage.
Inspect for cracks and hollowing. Cracks wider than 0.5 mm must be cut into V-shaped grooves and repaired with mortar. Hollow areas should be removed and re-poured, or filled with high-strength elastic grout.
Grind the entire surface to a rough finish to enhance paint adhesion, then remove dust with a vacuum cleaner. Ensure the surface moisture content is ≤ 6%.
Existing Concrete Substrate Requirements: Any existing coatings on the surface should be completely removed by grinding. The substrate must be dry and meet required strength and hardness standards. Note: Construction quality issues caused by chalking, water leakage, or seepage on the original substrate are not covered under warranty.
Mixing: Follow the primer manufacturer’s instructions; mix the main agent and curing agent at a precise ratio of 1:0.1. Stir thoroughly at low speed with an electric mixer for 5–8 minutes, then let stand for 10 minutes to allow air bubbles to escape.
Roller Coating/Spraying: Adjust the high-pressure airless sprayer to a pressure of 2 MPa. Hold the spray gun 30–50 cm away from the substrate at a 70°–80° angle and move evenly. Apply in cross-hatch pattern (horizontal then vertical) to ensure uniform coverage without missed spots or sagging. For roller coating, use the cross-hatch method to ensure the penetrating primer fully seeps into the substrate with no exposed areas.
After the penetrating primer is completely dry (approximately 8 hours), mix the unsaturated middle coat paint with cement and quartz sand at a ratio of 1:1.5:2. Stir evenly to achieve a workable viscosity; application methods include brushing or rolling.
For roller coating, use a long-pile roller to apply the paint evenly in a "W" pattern to avoid trapping air bubbles. For spraying, follow the same procedure as the primer application. Control the dry film thickness to [X] μm. After full drying, lightly sand the surface to enhance intercoat adhesion.
Mixing: On-site mixing of the two-component aspartic polyurea topcoat at a ratio of A:B = 2:1. Stir at high speed for 3–5 minutes, then immediately transfer to the spraying equipment or material container. Complete application within 30 minutes to prevent gelling and premature curing.
Spraying: Adjust the spray pressure to 6 MPa. Conduct construction under ambient conditions of 5–35℃ and relative humidity ≤ 75%. Apply multiple thin coats with an interval of 30–60 minutes between each coat. Achieve a total dry film thickness of [X] μm, ensuring a smooth, even surface free of pinholes, bubbles, and uniform color consistent with the design requirements.
Internal and External Corners: Apply pre-formed rubber corner guards first, then reinforce with an additional coat of paint (20% thicker than the standard coat) to prevent coating cracking caused by stress concentration.
Pipe Joints: Wrap with sealing tape, apply multiple coats of sealant, then cover with a polyurea coating extending beyond the joint area to ensure watertight sealing.
Slide Surfaces: After primer and middle coat application, add an appropriate amount of anti-slip aggregate to the topcoat, mix evenly, and spray. Once cured, the aggregate will protrude on the surface, achieving a friction coefficient of ≥ 50 to ensure sliding safety.
Implement a three-tier inspection system for each process: self-inspection by construction personnel, cross-inspection by work teams, and random inspection by quality control officers. Any work with a qualification rate below 95% must be immediately reworked.
Measure coating thickness with a thickness gauge at 1 point per 10 m²; allowable deviation is ± 10% of the designed thickness. Test adhesion using the cross-cut method, with a minimum requirement of Grade 1. Visually inspect for uniform color, smooth surface, and absence of defects such as sagging, shrinkage cavities, or blistering, with color strictly matching the color swatch.
Set up warning signs and safety slogans in the construction area. Construction personnel must wear protective clothing, safety goggles, and safety harnesses (for elevated work). Conduct regular safety training and emergency drills.
Store paints in a cool, well-ventilated warehouse, with separate storage for different types of materials. Keep flammable materials away from ignition sources and heat, and install fire dikes. Classify and recycle construction waste and packaging materials; seal empty solvent barrels and hand them over to professional disposal units. Spray water on-site to reduce dust, implement noise reduction measures for equipment, and discharge wastewater only after sedimentation to meet discharge standards, strictly controlling environmental pollution.
| Construction Phase | Duration (Days) | Key Milestone Description |
|---|
| Substrate Preparation | 4 | Complete grinding, repair and cleaning of the substrate for all pools and auxiliary structures; proceed to the next step only after passing inspection. |
| Primer Application | 3 | Complete primer spraying for all areas in sequence; pay attention to the impact of ambient humidity and temperature, and adjust the process promptly. |
| Middle Coat Application | 6 | Integrate grinding procedures to ensure the middle coat is flat, uniform and tightly bonded. |
| Topcoat Application | 5 | Precisely control the topcoat effect; complete the construction of special parts (e.g., slides) simultaneously, and prepare for final inspection. |
| Final Cleaning & Handover | 2 | Conduct a full inspection and touch up defects; clean up leftover materials and equipment on-site, and hand over the site. |
Prohibit impact, water immersion, or scratching of the coated surface within 7 days after completion. Install protective sheds for nearby construction activities to prevent damage from falling objects. No scribbling or pasting on the coating surface is allowed.
When putting the water park/pools into use, various disinfectants will be added. Recommendation: Dissolve all disinfectants in a container before adding them to the pools. Direct addition may cause localized oxidative spotting on the coating surface.